
Pruning
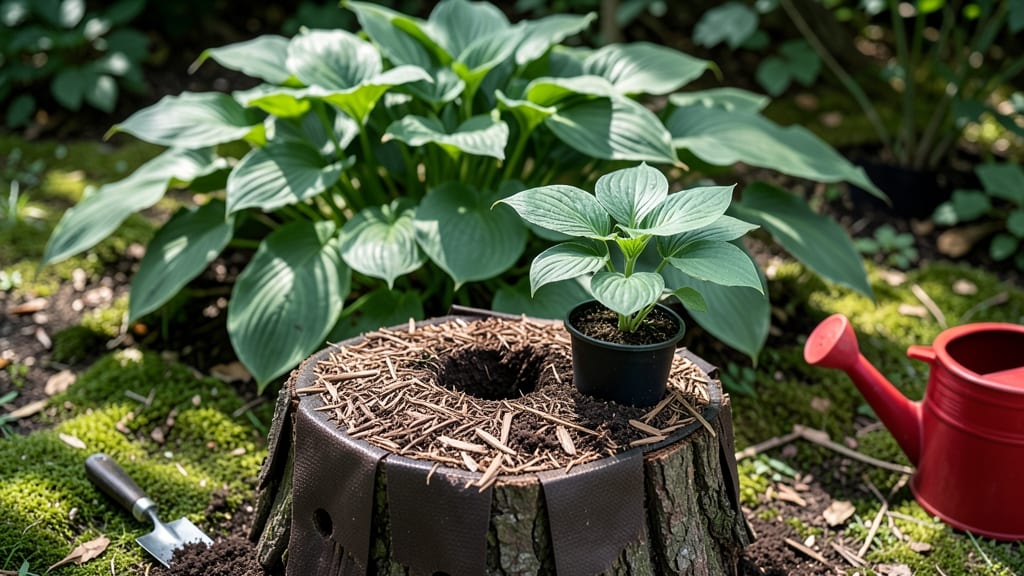
That tree stump in your yard isn’t dead weight—it’s a waiting garden feature. 🌿 I’ve turned three stumps into thriving planters, and the transformation takes less than an hour with basic tools. The result? A rustic, elevated garden bed that adds texture and charm while giving plants a unique home.
You’ll need a drill, some landscape fabric, potting soil, and your choice of small plants—succulents, herbs, or trailing flowers work beautifully. The key is creating drainage holes and lining the stump to prevent rot, then filling it with lightweight soil mix.
No fancy skills required, just a steady hand and a little creativity. By the end, you’ll have a self-watering planter that stays moist longer and looks like a natural art piece. The stump’s hollow center creates a cozy microclimate for delicate plants, and the elevated design keeps roots aerated.
Plus, it’s a conversation starter—neighbors will ask how you did it. Works for any stump size, from tiny saplings to old oak trunks. Here’s how to make it happen without a single board or nail.
📚 In This Guide
- What you need
- Instructions
- Tips and common mistakes
- Wrapping up and next steps
What you need
- ● Tree stump – Freshly cut (preferably within the last few months) or dried, with a diameter of at least 6 inches (larger stumps allow for more planting space).
- ● Drill – A cordless drill with adjustable speed (12V–18V recommended) for precision.
- ● Drill bits – A set of wood-boring bits (1/4" to 1" diameter) for drainage holes.
- ● Saw – A hand saw or jigsaw to carve out the planting cavity (if needed).
- ● Wood sealant or paint – Non-toxic, water-based sealant (e.g., blank">AFM Safecoat) or outdoor paint to protect the wood and enhance aesthetics.
- ● Potting soil – Lightweight, well-draining mix (e.g., blank">Miracle-Gro Garden Soil) or a blend of peat moss, perlite, and compost.
- ● Plants – Choose shallow-rooted, moisture-loving plants like ferns, moss, or small succulents (avoid heavy feeders like tomatoes!).
- ● Watering can or hose – For hydrating your new planter.
- ● Gloves – Work gloves to protect your hands from splinters and dirt.
- ● Safety gear – Safety goggles and a dust mask (especially if drilling dried wood).
- ● Decorative elements – Moss sheets, pebbles, or painted designs to customize your planter.
- ● Landscape fabric – To line the cavity and prevent soil from washing out.
- ● Stump cap or lid – A fitted wooden or metal cover to protect the top edge from moisture.
- ● Waterproof adhesive – For securing moss or decorative accents.
- ● Stump grinder (if needed) – To flatten the top of a fresh stump for a cleaner look.
Step-by-Step instructions for creating a tree stump planter
Turn that old stump into a charming, functional planter with just a few simple tools.
🪴 Step 1: Clean and Prepare the Stump
Start by removing any loose bark or debris from the stump using a putty knife or pruning shears. I like to scrub the surface with a stiff brush and soapy water to remove dirt and old sap. This ensures your plants have a clean, healthy foundation. Let the stump dry completely before moving to the next step—moisture can slow down the process and attract pests.
If the stump has deep cracks or holes, fill them with a wood filler or outdoor caulk designed for exterior use. Smooth the surface with sandpaper (80-100 grit) to create a better base for your liner. This step prevents soil from leaking out and keeps your plants contained. Wear a dust mask if you're sanding—wood dust isn't something you want to breathe in.
💧 Step 2: Line the Stump and Add Drainage
Cut a piece of heavy-duty landscape fabric or pond liner to fit inside the stump, leaving a few inches of extra material to fold over the edges. This liner prevents soil from escaping through cracks and protects the stump from rotting faster. Poke a few small holes in the bottom of the liner with a screwdriver to allow excess water to drain out—no one wants soggy roots in a stump planter.
Place a layer of small rocks or gravel at the bottom of the stump, covering the drainage holes in the liner. This creates a reservoir for excess water and keeps your soil mix light and airy. Use about 2-3 inches of gravel—enough to allow water to flow freely but not so much that it takes up too much space for planting. Press the liner up against the sides of the stump to eliminate any air pockets.
🌱 Step 3: Fill with Soil and Plant Your Garden
Fill the liner with a mix of potting soil and compost in a 2:1 ratio—this gives your plants the nutrients they need while keeping the soil light enough to drain well. I like to add a handful of slow-release fertilizer to the mix for an extra boost. Leave about 1 inch of space at the top of the stump to prevent soil from spilling out when you water.
Plant your chosen annuals, perennials, or even small shrubs, spacing them according to their mature size. Mosses, ferns, and shade-loving plants work beautifully in stump planters because they thrive in the moist, shaded environment. Water thoroughly after planting to settle the soil and help roots establish. Place your stump planter in a location that matches the light and moisture needs of your plants—most stump planters do well in partial shade.
Tips & tricks for perfect tree stump planters
Transforming a stump into a planter is all about the details—here's what I've learned to make the process smoother and your garden oasis even more stunning.
Surface Prep Secret: After cleaning the stump, I recommend using a wire brush to scour any remaining sap or stubborn debris. This creates tiny grooves that help the liner grip better in Step 1. For extra durability, apply a thin layer of outdoor sealant after sanding—it won't affect drainage but adds years to your planter's lifespan. Just make sure it's completely dry before adding the liner.
Liner Technique: When cutting your liner in Step 2, leave those extra inches to fold over the edges and tuck them neatly inside the stump. This prevents soil from escaping through cracks while keeping the liner snug. Pro tip: Use a staple gun to secure the liner at the top—it's more reliable than just folding. I've seen planters where the liner pulled away after just one watering!
Drainage Hack: For the 2-3 inches of gravel in Step 2, I like to use crushed granite instead of regular gravel—it's lighter and drains even better. You can find it at garden centers or hardware stores. Another trick: place a small piece of landscape fabric over the gravel before adding soil. This keeps the gravel from mixing with your potting mix while still allowing water to flow through.
Plant Selection Wisdom: While mosses and ferns are classic choices for stump planters, don't overlook succulents! They thrive in the well-drained environment and add a modern touch. Just be sure to choose varieties that tolerate partial shade. For maximum impact, arrange plants in odd numbers—three ferns or five succulents create more visual interest than even groupings.
Pro Tips for Make Tree Stump Planter
- Transforming a stump into a planter is all about the details—here's what I've learned to make the process smoother and your garden oasis even more stunning.
- Surface Prep Secret: After cleaning the stump, I recommend using a wire brush to scour any remaining sap or stubborn debris.
- Liner Technique: When cutting your liner in Step 2, leave those extra inches to fold over the edges and tuck them neatly inside the stump.
Frequently asked questions
Got questions about turning a tree stump into a planter? You’re not alone! Here are answers to the most common queries to help you create your upcycled garden oasis with confidence.
Can I use any tree stump for this project?
Not all stumps work—opt for hardwoods like oak, maple, or fruitwoods (e.g., apple or cherry). Softwoods (pine, fir) rot faster and may not hold up. Avoid stumps with active decay (mushrooms, cracks) or those treated with pesticides. If unsure, test with a screwdriver: if it sinks in easily, the wood is likely too soft.
How long does it take to dry a stump before planting?
Drying time varies by climate and stump size. In dry, sunny conditions, count on 4–8 weeks. For larger stumps (12"+ diameter), extend to 2–3 months. Check readiness by tapping the wood—it should sound hollow, not damp. Cover with a tarp during rain to speed things up!
What if my stump is too small or already rotting?
No worries! For small stumps (<6" diameter), use a wooden planter box or container garden instead. If rot is unavoidable, sand the surface thoroughly, apply a wood sealant, and line the interior with landscape fabric to protect roots. Alternatively, repurpose the stump as a raised bed frame or mulch base.
Will this attract pests like termites or ants?
Termites and ants are drawn to damp, untreated wood. To prevent issues:
- Seal the stump with outdoor wood sealant or linseed oil before planting.
- Elevate the planter slightly (use bricks or pavers) to improve airflow.
- Avoid planting near existing hives or termite-prone areas.
Can I plant in winter or should I wait for spring?
Timing depends on your climate! In mild winters (Zones 7–10), plant perennials in late fall for root establishment. In colder zones, wait until spring after the last frost (typically March–May). For annuals, spring is ideal. Pro tip: Use a greenhouse tray to start seeds indoors if you’re eager to plant early!
What’s the best way to remove old stump debris after planting?
Leave the outer bark and loose debris as mulch—it decomposes naturally. For larger chunks, break them down with a pry bar or hammer. If the stump was chemically treated, wear gloves and dispose of debris in a landfill (not compost). For a cleaner look, smooth the edges with sandpaper after planting.
Wrapping up and next steps
Transforming a leftover tree stump into a vibrant planter is a rewarding way to breathe new life into your garden while reducing waste! 🌱 With just a few tools and a little creativity, you’ve got yourself a stunning, functional centerpiece that adds charm and utility to your outdoor space.
Now that you’re equipped with the how-to and FAQs, why not take the next step?
Ready to level up your gardening game? Try experimenting with different plants—herbs, succulents, or even wildflowers—to see what thrives best in your stump planter. Share your progress or tag us in your garden makeover photos—we’d love to see your green thumb in action! 📸