
Tools
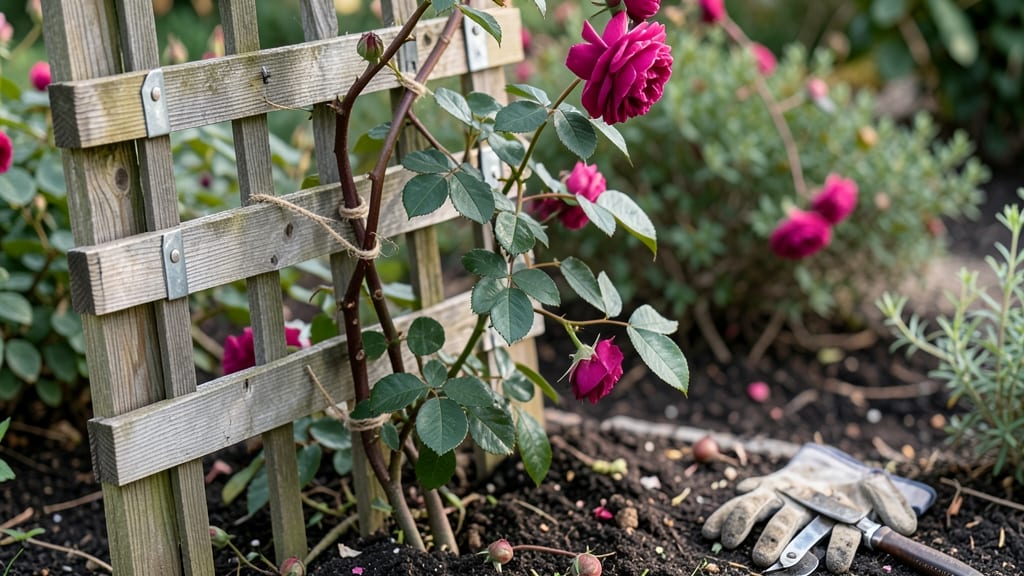
Climbing roses need support that’s both sturdy and stunning. 🌹 A well-built rose trellis isn’t just functional—it’s the backbone of your garden’s vertical drama, turning bare walls or fences into living canvases of blooms.
The right design elevates your roses while blending seamlessly into your landscape, whether you’re working with wood, metal, or bamboo. Start with materials that match your garden’s vibe: cedar resists rot, steel adds modern edge, or bamboo brings organic texture.
A 6-foot-tall grid (or taller for dramatic varieties) gives roses room to climb while keeping stems from flopping. The key is spacing—12-18 inches between vertical supports and 6-8 inches between horizontal slats ensures airflow and easy pruning access.
By the end, you’ll have a trellis that’s strong enough to handle heavy blooms yet light enough to feel like part of the garden, not an afterthought. The roses will thrive, and your space will feel more intentional—like every stem has a place to grow upward, not sprawl outward.
Pro tip: Bury supports 12 inches deep for stability, and angle the top slightly outward to guide vines upward naturally. This small detail makes all the difference in how your roses perform—and how polished your garden looks. Ready to build?
📚 In This Guide
- What you need
- Instructions
- Tips and common mistakes
- Wrapping up and next steps
What you need
- ● Trellis Frame: 4–6 wooden posts (4x4 inches, 6–8 feet tall, pressure-treated for durability)
- ● 2x4 lumber (for horizontal and vertical supports—calculate based on your trellis size, typically 8–12 feet long)
- ● Grid or Lattice: 1/2-inch or 3/4-inch wooden lattice panels (pre-cut or DIY with 1x2 slats spaced 2–4 inches apart)
- ● OR metal grid mesh (galvanized wire or plastic-coated, 1-inch squares)
- ● Hardware: Galvanized or stainless steel screws (2.5–3 inches long, 100+ pieces)
- ● Heavy-duty exterior wood glue (for extra reinforcement)
- ● Concrete footing mix (for anchoring posts, ~5–10 lbs per post)
- ● Measuring tape and pencil
- ● Circular saw or miter saw (for cutting lumber)
- ● Drill/driver with screw bits
- ● Level (to ensure your trellis stays straight!)
- ● Post hole digger or auger (for setting footings)
- ● Safety gear (gloves, goggles, ear protection)
- ● Stain or paint (for weatherproofing wood)
- ● Decorative trim or vinegar (to enhance aesthetics)
- ● Galvanized brackets (for extra grid support)
- ● Post caps (to protect the tops of your wooden posts)
Step-by-step instructions for building a sturdy rose trellis
Here's how to create a strong, decorative grid that supports climbing roses beautifully.
🪴 Step 1: Gather Materials and Measure Your Space
You'll need 4 wooden posts (4x4 inches, 6 feet tall), 1-inch thick wooden slats (2x4 feet long), galvanized screws (2.5 inches), wood glue, and a measuring tape. First, mark where you want the trellis—choose a spot with 6+ hours of sunlight where roses can climb freely. Measure the space between posts: for most gardens, 4-5 feet apart works well.
Dig holes for the posts 1 foot deep and 6 inches wide—this ensures stability. I like to set the posts in concrete mix for extra support, especially if your garden gets windy. Level each post carefully before securing it so your trellis stays straight. A small bubble level helps here, but you can eyeball it too if you're patient.
✂️ Step 2: Build the Frame and Attach Horizontal Supports
Cut 4 horizontal slats (2x4 feet) to create the top and bottom rails of your trellis. Attach them to the posts using 2 screws per post—pre-drill holes to prevent splitting. Space the top rail 5 feet from the ground and the bottom rail 1 foot up. This gives roses plenty of room to grow without overcrowding.
Now add vertical supports: cut 4 more slats (2x4 feet) and space them evenly between the posts. Screw them into the rails, leaving 12-inch gaps between each vertical slat. This creates a grid where rose canes can weave through naturally. I like to stagger the vertical slats slightly for a more organic look—just offset them by 2 inches at each post.
🌿 Step 3: Create the Climbing Grid with Diagonal Supports
Cut 4 diagonal slats (2x4 feet) to connect the vertical supports in an "X" pattern. This adds extra strength and gives roses more places to latch onto. Start at the bottom of one vertical slat and screw the diagonal piece up to the top rail, then repeat on the opposite side. The diagonals should cross in the middle, forming a sturdy lattice.
For a more decorative touch, add 2-3 horizontal slats (2x4 feet) between the top and bottom rails, spacing them 1 foot apart. This creates a grid roses can climb through easily. Use wood glue along with screws for extra durability—especially if your trellis will face rain or humidity. Let the glue dry completely before moving on.
☀️ Step 4: Finish and Plant Your Roses
Sand any rough edges and apply a weather-resistant sealant to protect the wood. I prefer a clear polyurethane finish—it keeps the natural look while shielding the trellis from moisture. Let it dry fully before planting. Now, position your climbing rose at the base of the trellis, 6 inches from the structure, and water deeply to help roots establish.
As the rose grows, gently weave the canes through the grid. Prune side shoots to encourage upward growth, and train the main stems along the diagonals for the best support. Your trellis should last 5-10 years with proper care—just reapply sealant every 2-3 years to keep it looking fresh.
Tips & tricks for building a sturdy rose trellis
Building a trellis that lasts and looks beautiful takes a few key tricks to avoid common pitfalls. Here's what I've learned from years of gardening—these details make all the difference between a flimsy structure and one that supports your roses for a decade.
Post Placement Matters: When digging those 1-foot deep holes for your 4x4 posts, take an extra 10 minutes to check for buried rocks or roots. I've seen too many trellises tilt when posts sink unevenly into soft soil. If you hit obstacles, either adjust the hole depth or use a post leveler to create a stable base before adding concrete mix. This ensures your trellis stays perfectly vertical even in windy conditions.
Pre-Drilling Prevents Splitting: Before attaching any of those 2x4 slats with galvanized screws, always pre-drill pilot holes that are 1/16-inch smaller than your screw diameter. I learned this the hard way when a 2.5-inch screw split a 4x4 post during assembly. The extra 30 seconds of pre-drilling saves you from having to start over with new wood—and trust me, you don't want to waste perfectly good lumber on this mistake.
Glue Adds Unseen Strength: Don't skip the wood glue when attaching the diagonal supports in Step 3. While screws provide the structural integrity, the glue creates an invisible bond that prevents wood from shifting over time. Apply a thin bead along each joint before screwing, then wipe off excess immediately. Let the glue dry completely (about 24 hours) before planting—this hidden step is what makes your trellis last 5-10 years instead of just a couple.
Sunlight and Spacing: That 6+ hours of sunlight recommendation isn't just about roses—it's also about your trellis materials. Cedar or redwood naturally resist rot better in wet conditions, so if your garden gets frequent rain, consider upgrading to these woods even if they cost more upfront. The 4-5 foot spacing between posts also creates better airflow, which helps prevent fungal issues on both wood and roses during humid summers.
Pro Tips for Make A Rose Trellis
- Building a trellis that lasts and looks beautiful takes a few key tricks to avoid common pitfalls.
- Post Placement Matters: When digging those 1-foot deep holes for your 4x4 posts, take an extra 10 minutes to check for buried rocks or roots.
- Pre-Drilling Prevents Splitting: Before attaching any of those 2x4 slats with galvanized screws, always pre-drill pilot holes that are 1/16-inch smaller than your screw diameter.
Frequently asked questions
Got questions about building your rose trellis? You’re not alone! Here are answers to the most common concerns—so you can create a sturdy, beautiful structure with confidence.
What’s the best material for a rose trellis?
For durability, galvanized metal or cedar are top choices—cedar resists rot, while metal won’t warp. If you’re on a budget, powder-coated steel or treated lumber work well too. Avoid pressure-treated wood with high arsenic levels (check labels for "ACQ" or "CA" instead).
When is the best time to install a rose trellis?
Install it early spring (before planting roses) or late fall (after frost) to avoid disturbing roots. If planting new roses, add the trellis at the same time to minimize stress. For established roses, wait until dormant season—early spring or after blooming—to reduce shock.
Can I use a trellis for other climbing plants?
Trellises work for clematis, jasmine, morning glories, or even grapes. Just adjust the spacing: roses need 3–4 feet of vertical support, while clematis may need taller structures. Use the same grid design, but check plant-specific growth habits for pruning needs.
How do I fix a wobbly or leaning trellis?
Start by checking the base—ensure it’s buried at least 6 inches deep or anchored with stakes. For metal frames, tighten bolts or add diagonal braces. If using wood, reinforce with concrete footings or screw in L-brackets for stability. Avoid overloading with heavy vines until fully secured.
How can I make my trellis look decorative?
Paint or stain it to match your garden’s aesthetic! Use non-toxic, weatherproof paint (like milk paint or acrylic) for a rustic or modern look. Add ornamental ironwork, mosaic tiles, or climbing vines with contrasting colors (e.g., deep red roses + silver foliage). Solar-powered string lights? Even better!
Wrapping up and next steps
Building your own rose trellis is a rewarding project that adds beauty and structure to your garden while supporting those stunning climbing roses! 🌹 With the right materials—like sturdy posts, lattice panels, and a little elbow grease—you’ll create a functional and eye-catching design that lasts for years.
Whether you’re a beginner or a seasoned DIYer, this guide makes it simple.
Now that you’re armed with the knowledge, roll up your sleeves and get started! Once your trellis is up, watch your roses climb and thrive—it’s like magic in garden form. Pro tip: Snap a photo of your finished project and share it with fellow gardening enthusiasts for some well-deserved bragging rights! 🌿