
Tools
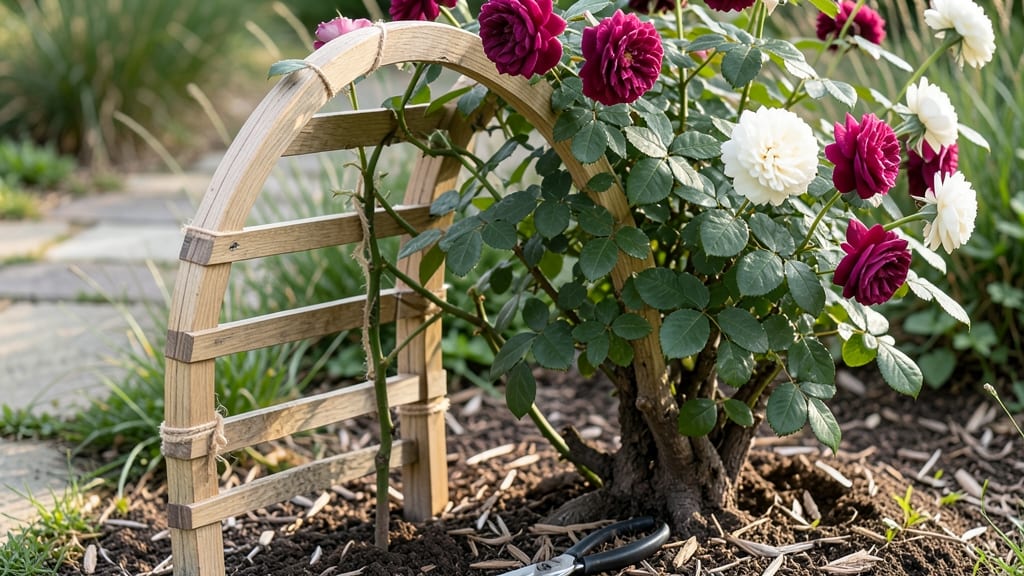
How to make a rose bush trellis transforms any garden in minutes—but without proper support, those lush blooms turn into tangled messes. 🌹 I’ve built trellises from scrap wood, bamboo, and even repurposed metal fencing, and the difference is night-and-day: better airflow, fewer pests, and roses that grow instead of flop. The best part? You don’t need fancy tools or expensive materials. A simple 4x4 post or sturdy bamboo stakes can create a foolproof frame in under an hour. Whether you want a classic arbor, a sleek obelisk, or just a few stakes to guide vines, the structure keeps roses upright, blooms accessible, and your garden looking intentional. Once installed, your roses will climb with purpose, producing more flowers and healthier canes than unsupported bushes. The trellis also makes pruning and deadheading easier—no more wrestling with sprawling vines. Plus, it’s a garden design game-changer that adds vertical interest without taking up valuable ground space. Works for newcomers or pros, and adapts to any garden style. Let’s build one that lasts seasons—not just one growing season."
📚 In This Guide
- What you need
- Instructions
- Tips and common mistakes
- Wrapping up and next steps
What you need
- ● Trellis Frame Base: 4 wooden posts (4x4 inches, 6–8 feet tall) – for stability
- ● OR 2x4 lumber (for a simpler, freestanding design)
- ● Lattice or Trellis Panels: 1–2 pre-made lattice panels (4x8 feet, 1-inch grid) – or
- ● 1x2 or 1x3 lumber strips (cut into 1-inch spacing for DIY lattice)
- ● Hardware: Galvanized screws or nails (2.5–3 inches long, 50–100 pieces)
- ● Wood glue (for extra reinforcement)
- ○ Corner braces (optional, for added strength)
- ● Finishing Touches: Outdoor wood stain or paint (weather-resistant)
- ● Sandpaper (80–120 grit, for smooth edges)
- ● Measuring tape
- ● Circular saw or handsaw (for cutting lumber)
- ● Drill/driver (with screw bits)
- ● Level (to ensure your trellis stands straight!)
- ● Hammer (if using nails)
- ● Clamps (for holding pieces in place while assembling)
- ● Safety gear (gloves, goggles)
- ● A flat, level spot near your rose bush (or where you plan to plant it)
- ● Basic woodworking skills (or patience to follow step-by-step guides!)
- ● Clear, dry weather (for staining/painting)
Step-by-Step instructions for building a DIY rose trellis
This simple, sturdy design supports climbing roses beautifully while keeping construction quick and budget-friendly.
🪴 Step 1: Gather Materials and Tools
For a 4-foot tall trellis supporting 4 climbing rose bushes, you'll need 4 wooden posts (4x4 inches, 6 feet long), 10-12 horizontal slats (2x4 inches, 4 feet long), 2 bags exterior wood screws (2.5-3 inches), 1 can exterior wood stain or paint, and 1 tube wood glue. I prefer cedar or redwood for natural rot resistance, but treated pine works too if stained properly.
Grab your circular saw, drill/driver, level, measuring tape, pencil, and safety gloves before starting. Pre-cutting the slats to size saves time—mark each at 12-inch intervals along the 4-foot length. This creates 4 rows of support for the rose canes to climb through. Label each slat with its position (top, middle, bottom) to avoid confusion during assembly.
✂️ Step 2: Assemble the Vertical Posts
Dig 6-inch deep holes for each post, spacing them 4 feet apart in a square or rectangular pattern. The exact spacing depends on your garden layout, but 4 feet between posts creates a stable frame for mature roses. Use a level to ensure posts stand perfectly vertical before backfilling with soil and tamping firmly.
Once the posts are set, attach horizontal braces between them for extra stability. Cut 2x4 braces (4 feet long) and secure them 12 inches from the top and bottom of each post using 3-inch exterior screws. Drive screws at 45-degree angles into the post edges for maximum strength. This creates a rectangular frame that won’t wobble when roses lean against it.
🌿 Step 3: Install the Horizontal Slats
Starting at the bottom of the frame, attach the first slat 12 inches from the ground. Use wood glue along the screw holes to prevent splitting, then secure with 2 screws per post. Space the remaining slats 12 inches apart vertically—this gives roses enough room to weave through while maintaining support. The top slat should sit 6 inches below the post tops to allow for future growth.
For extra durability, pre-drill pilot holes in the slats before screwing them into the posts. This prevents wood from cracking, especially if you’re using untreated lumber. After installation, sand any rough edges with 80-grit sandpaper to avoid snagging rose canes later. A smooth finish also makes cleaning easier in wet seasons.
☀️ Step 4: Finish and Secure the Trellis
Apply exterior wood stain or paint to protect the trellis from moisture and UV damage. I recommend a semi-transparent stain to preserve the wood’s natural look while adding weather resistance. Let it dry 24 hours before attaching roses. If you’re in a high-rainfall area, add waterproofing sealant to the screw holes to prevent rust from seeping into the wood.
Finally, tie the rose canes to the trellis using jute twine or soft plant ties as they grow. Start by loosely securing the main stems to the bottom slat and gently guiding them upward. Avoid tying too tightly—you want the canes to flex slightly in the wind. Check ties every 2 weeks and adjust as the roses thicken. A well-supported trellis will keep your climbing roses healthy and blooming for years.
Tips & tricks for perfect rose trellis construction
Building a sturdy trellis is all about precision and smart planning—here's how to avoid common pitfalls and elevate your garden setup.
Material Selection: Cedar or redwood may cost more upfront, but their natural rot resistance means your trellis will last 5-7 years without maintenance. If using treated pine, apply an extra coat of exterior stain to extend its lifespan—especially in wet climates where moisture accelerates wood decay.
Precision Cutting: When marking your 2x4 slats at 12-inch intervals in Step 1, use a straightedge and pencil to draw clean, visible lines. I've learned the hard way that uneven cuts lead to wobbly slats that can't properly support climbing roses. A miter saw creates cleaner cuts than a circular saw, but even a sharp handsaw works if you take your time.
Stabilization Strategy: The 45-degree screw angles mentioned in Step 2 aren't just for show—they create hidden structural reinforcement. For added strength, consider adding a diagonal brace between opposite corners of your frame (optional but recommended for windy areas). This creates a triangle shape that distributes weight more evenly.
Long-Term Maintenance: After your 24-hour drying period for the stain, apply a waterproofing sealant to all screw holes—this prevents moisture from seeping in and causing rust stains on your trellis. I also recommend checking all connections annually and tightening any loose screws before spring planting season.
Pro Tips for Make A Rose Bush Trellis
- Building a sturdy trellis is all about precision and smart planning—here's how to avoid common pitfalls and elevate y...
- Material Selection: Cedar or redwood may cost more upfront, but their natural rot resistance means your trellis will ...
- Precision Cutting: When marking your 2x4 slats at 12-inch intervals in Step 1, use a straightedge and pencil to draw ...
Frequently asked questions
Got questions about building your own rose bush trellis? You’re not alone! Here are some of the most common concerns—and straightforward answers—to help you get started with confidence.
What’s the best time of year to install a rose trellis?
The ideal time is early spring (before new growth starts) or late fall (after the first frost). This gives your roses a full growing season to climb and strengthen. If you’re planting new roses, install the trellis at the same time to avoid root disturbance later.
Do I need special tools to build a trellis, or can I use basic ones?
Nope! Basic tools like a hacksaw, drill, measuring tape, and level are all you need. If you’re using pre-cut materials (like PVC pipes or wooden stakes), even simpler. Just ensure your tools are sharp and sturdy for clean cuts—no fancy equipment required!
How tall should my trellis be for climbing roses?
Most climbing roses thrive on trellises 6 to 10 feet tall, but check your specific variety. Hybrid teas often need 6–8 feet, while ramblers can reach 10+ feet. If space is limited, a 4–5 foot trellis works for smaller varieties like climbing roses or rambling roses with gentle pruning.
What if my rose bush doesn’t climb the trellis? How do I encourage it?
Start by tying the main canes to the trellis with soft plant ties or strips of fabric (never wire—it can damage bark). Prune back overcrowded canes to focus energy on upward growth. If your rose is slow to climb, it might need more sunlight or balanced fertilizer (high in phosphorus). Patience helps—some varieties take a season to latch on!
Can I use a trellis for other plants besides roses?
Trellises work great for clematis, jasmine, grapes, beans, or even cucumbers. Just adjust the height and spacing: vining plants need taller supports, while bushy varieties (like tomatoes) may prefer a cage or stake instead. Get creative—your garden will thank you!
Still stumped? Drop your question in the comments—we’re happy to help!
Wrapping up and next steps
Building a rose bush trellis is a rewarding project that adds both beauty and structure to your garden! With the right materials and a little creativity, you can create a sturdy frame that supports climbing roses while enhancing your outdoor space.
Whether you’re a seasoned DIYer or just starting out, this project is achievable with patience and care.
Now that you’re equipped with the knowledge, roll up your sleeves and get building! Once your trellis is complete, watch your roses climb and flourish—it’s a small effort for a big payoff. Happy gardening! 🌹✨