
How To
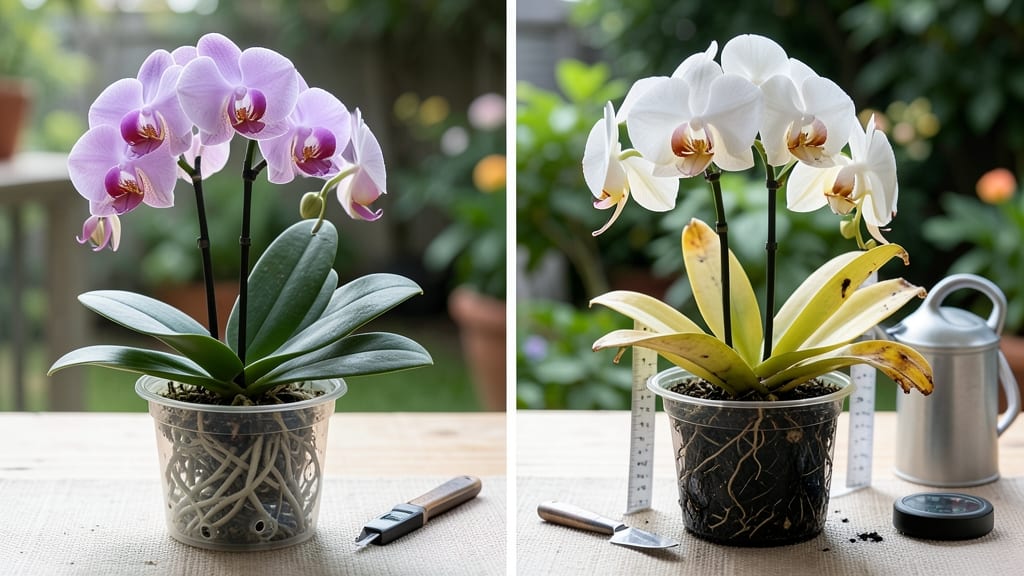
How to know if your orchid is overwatered? Those yellow leaves and mushy roots are the plant’s way of screaming for help—it’s drowning in its own pot. 💧 I’ve nursed back more orchids from this exact problem than I’d like to admit, and the first step is spotting the warning signs before it’s too late—because overwatering doesn’t just kill roots, it chokes your plant’s future blooms.
Start by checking the roots: healthy ones are green or silvery, while overwatered roots turn black, mushy, or smell like rot. The potting mix might also give it away—if it holds moisture for weeks or emits a sour, fermented odor, that’s your answer.
And don’t ignore the leaves: yellowing (especially at the base), wrinkled texture, or drooping despite water mean your orchid’s drowning in its own pot.
Fixing it is simpler than you’d think: repot immediately in fresh, chunky bark mix, trim the black roots with sterilized scissors, and let the pot dry completely between waterings. Within weeks, you’ll see fresh green roots sprouting—proof your orchid’s fighting back.
The key? Patience—orchids hate soggy feet, so err on the side of underwatering until you’ve mastered the rhythm.
This works for Phalaenopsis, Cattleyas, and even finicky Dendrobiums. The trick isn’t fancy tools—it’s paying attention to what your orchid tells you through its roots and leaves. Trust the signs, and your plant will bounce back stronger than ever.
Root Causes Of Overwatering
Orchids are delicate plants that thrive in a balance of moisture and airflow—but when that balance tips, overwatering becomes a silent killer. Understanding why this happens helps you prevent it before your orchid’s roots turn mushy or its leaves yellow. Here are the most common culprits, explained in detail.
Orchids detest soggy roots because their natural epiphytic lifestyle (growing on trees or rocks) means they’re used to drying out between waterings. If your pot lacks drainage holes or uses compacted soil, water pools at the bottom instead of draining away.
Over time, this creates an anaerobic (oxygen-free) environment where harmful bacteria and fungi thrive, leading to root rot.
- Why it matters: Roots need oxygen to respire—without it, they suffocate and decay.
- Actionable fix: Repot into a bark-based mix with perlite or charcoal, and always use containers with drainage holes.
- Pro tip: 💡 Test drainage by pouring water into the pot—if it sits for more than 10 minutes, your orchid is at risk.
Many growers assume orchids need frequent watering, but most varieties only need water every 7–10 days (or when the potting mix dries out). Overwatering often stems from:
- Ignoring the plant’s signals: Wilting or drooping can mean underwatering (thirst) or overwatering (root stress). Check the roots—if they’re slimy or black, you’ve watered too much.
- Environmental factors: Humidity, temperature, and airflow affect evaporation rates. A low-light orchid may dry out slower than one in bright indirect light.
- Mistaking thirst for thirst: Some growers water on a strict schedule instead of checking moisture levels.
Science alert: Orchid roots absorb water through velamen, a spongy outer layer. When constantly wet, this layer breaks down, blocking nutrient uptake and inviting pathogens.
Not all potting mixes are created equal. Orchids need a chunky, airy medium—like bark, sphagnum moss, or coconut husk chips—to allow roots to breathe. Heavy garden soil or coconut coir (without additives) compacts over time, trapping moisture and cutting off oxygen.
| ❌ Problem Mixes | ✅ Ideal Mixes |
|---|---|
| Garden soil, peat-only mixes, coconut coir without perlite | Bark chips, perlite, charcoal, sphagnum moss blends |
| Retains water for days | Dries out in 3–5 days |
Key insight: A good mix should feel dry to the touch between waterings and crumble easily when squeezed.
Orchids in cool climates (like Cymbidium or Dendrobium) dry out faster than tropical types (Phalaenopsis), but high humidity slows evaporation, keeping roots damp longer. If your home is humid (60%+) or lacks airflow, water can linger in the pot, promoting rot.
- Red flags:
- Condensation on leaves (sign of trapped moisture).
- Slow-drying potting mix (test by lifting the pot—if it’s heavy, it’s soggy).
- Solution: Use a fan for airflow, avoid misting, and water only when the top inch of mix is dry.
Orchids left in the same pot for 2+ years often develop root-bound conditions, where roots grow in tight circles and suffocate each other. This traps moisture, creating pockets of rot. Even if you water correctly, overcrowded roots can’t dry efficiently.
Visual clue: Roots circling the pot like a spiral or poking out of drainage holes.
Fix it: Repot every 1–2 years, trimming dead roots and loosening healthy ones to encourage outward growth.
Reviving Your Orchid After Overwatering
If your orchid’s leaves are yellowing, mushy, or the roots smell foul, don’t panic—your plant can often bounce back with the right care. The key is acting fast to stop the damage and giving your orchid the conditions it needs to recover.
Below, we’ll break down the fixes based on the specific symptoms you’re seeing, plus pro tips to keep your orchid thriving long-term.
Root rot is the most critical issue from overwatering, but it’s treatable if caught early.
🔥 Step 1: Remove the Orchid from the Pot
Gently slide your orchid out of its container. If the roots are firmly stuck, soak the pot in warm water for 10–15 minutes to loosen them.
🍳 Step 2: Trim the Damaged Roots
- Use sterilized scissors or pruning shears (wipe with rubbing alcohol first).
- Cut away any black, brown, or mushy roots—they won’t recover.
- Healthy roots should be firm and green or silvery-gray.
- Pro tip: 💡 If you’re unsure whether a root is dead, gently squeeze it.
If it oozes a dark liquid or feels squishy, trim it.
👨🍳 Step 3: Disinfect the Cuts
Dust the trimmed areas with cinnamon powder (a natural antifungal) or cauterize with a match (hold a lit match to the cut for 2–3 seconds). This helps prevent further infection.
🥘 Step 4: Let It Dry Out
- Place your orchid in a shady, well-ventilated spot (no direct sunlight).
- Do not water it for 5–7 days to allow the roots to dry and callus over.
- Pro tip: ✨ Use a fan on low to speed up drying if your home is humid.
⏰ Step 5: Repot in Fresh Medium
- Choose a clean, well-draining pot (clay or plastic with drainage holes).
- Use fresh bark mix (never reuse old potting medium—it holds bacteria).
- Pro tip: 🌡️ If repotting in summer, avoid the hottest part of the day to reduce stress.
📊 Prevention for the Future
- Water only when the top inch of the medium feels dry (stick your finger in to check).
- Use a pot with drainage holes—never let your orchid sit in saucers of water.
- Avoid misting the leaves—water should only go at the base.
- Fertilize lightly (once a month in spring/summer) to avoid salt buildup, which worsens rot.
If the roots look healthy but the leaves are yellowing, your orchid is likely suffering from edema (waterlogged cells) or nutrient imbalance.
🔥 Step 1: Adjust Your Watering Routine
- Water deeply but infrequently—orchids prefer drying out slightly between waterings.
- Soak-and-drain method: Water until it runs out the bottom, then empty the saucer.
- Pro tip: 💡 Use room-temperature water (cold water shocks the roots).
🍳 Step 2: Improve Airflow
- Move your orchid to a bright, indirect spot with good air circulation (e.g., near a window with a fan).
- Avoid cramming orchids too close together—this traps humidity.
👨🍳 Step 3: Check for Pests
Yellowing leaves can also signal scale, mealybugs, or spider mites.
- Wipe leaves with a soapy water cloth (1 tsp mild soap per gallon of water).
- Pro tip: 🔥 If pests persist, use neem oil spray (follow package instructions).
🥘 Step 4: Feed It Right
- Hold off on fertilizer for 2–4 weeks to let the plant recover.
- Once stable, use a balanced orchid fertilizer (20-20-20 or 10-10-10) diluted to half strength.
- Pro tip: 🌱 Epsom salt (1 tsp per gallon) once a month boosts magnesium, which helps with yellowing.
✨ Long-Term Care Tips
- Rotate your orchid weekly so all sides get even light.
- Monitor humidity—ideal levels are 40–70% (use a hygrometer if needed).
- Avoid ice cubes—they can cause sudden temperature shocks.
If your orchid has no healthy roots left but still has green leaves, it might be salvageable with propagation.
🔪 Step 1: Divide the Plant
- Carefully separate the pseudobulbs (thickened stems) from the base.
- Each section should have at least one healthy leaf or growth node.
🌱 Step 2: Let Them Dry and Root
- Place the cuttings in a shady, dry spot for 3–5 days to callus.
- Plant them in fresh bark mix and do not water for 7–10 days.
- Pro tip: 🎯 Use a clear plastic bag (not sealed) to create a humid microclimate while they root.
💪 Recovery Timeline
- Weeks 1–2: No watering—let the cuts heal.
- Weeks 3–4: Light misting (if the medium feels dry).
- Month 2+: Slowly reintroduce normal care.
With patience and the right adjustments, your orchid can make a full recovery—sometimes even producing new growth within weeks! The key is consistency: stick to a watering schedule, prioritize drainage, and keep an eye on those roots. Soon, your once-wilted beauty will be blooming stronger than ever. 🌸
Frequently asked questions
Why do my orchid leaves turn yellow first when it's overwatered?
Yellowing leaves are your orchid’s first distress signal because they’re the plant’s water storage system. When roots can’t absorb water efficiently (due to rot or compacted mix), the leaves start breaking down to conserve moisture. Check the roots first—they’ll reveal whether it’s overwatering or another issue like pests or nutrient deficiency.
Can I save an orchid with completely black, mushy roots?
Yes, but you’ll need to act fast! Trim all black/mushy roots with sterilized scissors, then repot in fresh bark mix. Let the plant dry out for 5–7 days before watering again. If no green roots remain, try propagation—cut healthy pseudobulbs and root them separately. Even severely damaged orchids can regrow with patience!
How often should I water my orchid to avoid overwatering?
Most orchids need water every 7–10 days, but the key is checking moisture—not sticking to a schedule. Stick your finger 1 inch into the mix: if it feels dry, water thoroughly until it drains. In winter, reduce watering to every 2–3 weeks—orchids grow slower then and need less moisture.
What does a healthy orchid root look like vs. an overwatered one?
Healthy roots are green or silvery-gray and firm to the touch. Overwatered roots turn black, brown, or mushy, often with a foul smell. A quick test: gently squeeze a root—if it oozes liquid or feels slimy, it’s rotting. Healthy roots should spring back when pressed.
Will my orchid survive if I stop watering it completely?
Not indefinitely! Orchids need moisture, but they can survive 2–3 weeks without water if they have some roots. However, prolonged drought causes leaf drop and weakens the plant. The goal is balance: water when the mix is dry, but never let it stay soggy. Use a moisture meter if you’re unsure!