
Orchid Care
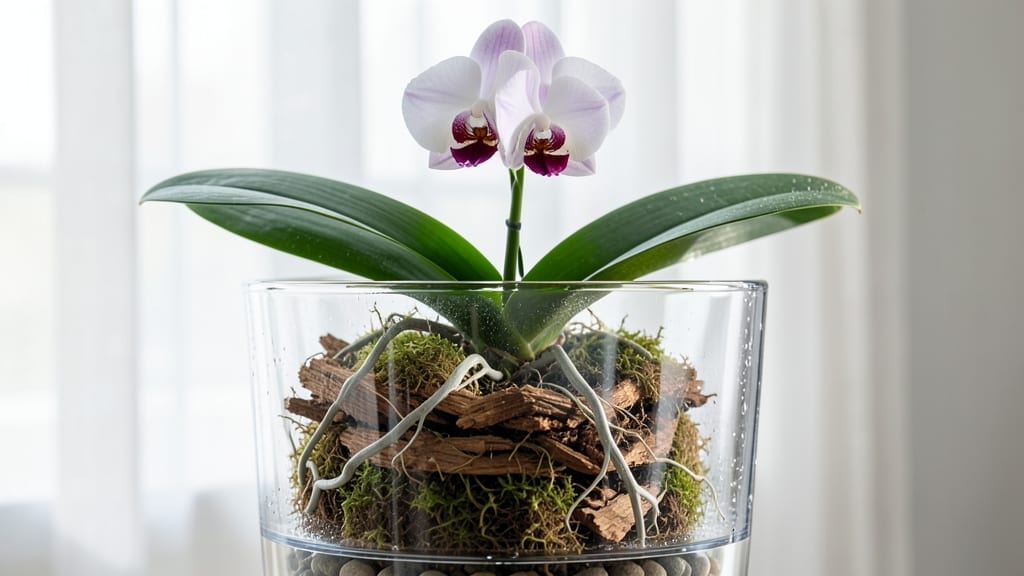
How to grow orchids in glass creates a mesmerizing indoor jungle. ✨ I’ve watched Phalaenopsis and Paphiopedilum thrive in repurposed jars and terrariums—proof that glass containers aren’t just decorative, they’re functional. The key? Balancing humidity, airflow, and light without letting the glass become a death trap for roots.
Start with a glass vessel that’s at least 6 inches wide—wide-mouth jars or fishbowls work best. Drill tiny drainage holes in the lid (or use a mesh screen) to prevent root rot, then line the bottom with 1-2 inches of charcoal to absorb excess moisture.
Your orchid’s potting mix should be chunky and airy—never compacted—so roots breathe while the glass traps humidity.
Place your glass garden near bright, indirect light (east or north-facing windows are ideal) and water once a week by misting the glass walls or soaking the substrate until water drips from the holes.
The magic happens when condensation forms on the glass—this means your orchid’s humidity needs are met, and blooms will last weeks longer than in open pots.
Watch for yellowing leaves (overwatering) or shriveled roots (low humidity) and adjust by tweaking the lid’s ventilation or moving the glass closer to a humidifier. With this setup, even Paphiopedilum—the finicky "lady’s slipper" orchids—produce two bloom cycles a year.
The glass isn’t just a container; it’s a self-sustaining ecosystem.
📚 In This Guide
- What you need
- Instructions
- Tips and common mistakes
- Wrapping up and next steps
What you need
- ● Glass container: A clear, airtight glass jar, bowl, or terrarium (minimum 6-inch diameter for small orchids, 12+ inches for larger varieties). Choose one with a snug-fitting lid (or use a separate lid if needed).
- ● Orchid: A healthy Phalaenopsis (moth orchid) or Paphiopedilum (lady slipper orchid)—both adapt well to enclosed environments. Start with 1-2 plants per container.
- ● Orchid bark or sphagnum moss: 1-2 cups of fine-grade fir bark (for drainage) or sphagnum moss (for moisture retention). Avoid peat moss—it compacts too much.
- ● Activated charcoal: 1-2 tablespoons (prevents mold and keeps water fresh).
- ● Distilled or rainwater: ¼–½ cup (tap water can harm orchids long-term).
- ● Small pebbles or perlite: ½ cup (for drainage layer at the bottom).
- ● Spray bottle: (for occasional misting if humidity drops).
- ● Tweezers or chopsticks: For gently arranging bark/moss without disturbing roots.
- ○ Small fan (optional): A low-speed USB fan (if your glass container lacks ventilation holes) to prevent stagnant air.
- ● Hygrometer: To monitor humidity levels (60-80% ideal).
- ○ LED grow light (optional): If your setup lacks natural light, a 12-15W full-spectrum LED (8-12 inches above the plant) works wonders.
- ● Decorative elements: Miniature figurines, moss, or driftwood (for aesthetics—sterilize first!).
Step-by-Step instructions for creating a glass orchid humidity dome
This clever glass enclosure tricks orchids into tropical conditions—no greenhouse needed.
🪴 Step 1: Select the Right Glass Container
Choose a clear glass container with a lid—think mason jars, fishbowls, or terrariums—large enough to hold your orchid pot while allowing 2-3 inches of air space above the plant. I prefer quart-sized jars for single orchids; they’re sturdy and let me monitor moisture easily. The glass must be scratch-free—any damage can harbor bacteria that stress orchids.
Place the orchid pot inside and check that the lid fits snugly but doesn’t crush the leaves. If gaps exist, line the rim with a thin strip of damp paper towel to seal humidity in. This isn’t just about keeping moisture—it’s about recreating the high humidity (60-80%) orchids crave without overwatering.
💧 Step 2: Prepare the Humidity Base
Add a 1-inch layer of moisture-retaining material to the container’s base—sphagnum moss or pebbles work best. I use sphagnum moss because it holds water without suffocating roots. Soak it thoroughly in room-temperature water until it’s squeezable but not dripping, then let it drain for 10 minutes to avoid soggy conditions.
Place the orchid pot on top of the moss, ensuring the drainage holes aren’t blocked. The goal is to keep the root zone slightly elevated—orchid roots need airflow but benefit from the humidity rising from below. If using pebbles, rinse them first to remove dust, which can clog pores and prevent moisture absorption.
☀️ Step 3: Position for Optimal Light and Temperature
Place your glass enclosure in bright, indirect light—think east or north-facing windows—where temperatures stay between 65-75°F. Direct sun will overheat the glass, causing condensation to scald leaves, while dim light leads to weak, leggy growth. You’ll know the light is right when the orchid’s leaves stay deep green and firm to touch.
Open the lid for 10-15 minutes daily to allow air circulation and prevent fungal growth. I crack mine in the morning to let fresh air in, then reseal by afternoon. This mimics the natural humidity fluctuations in tropical forests, where orchids experience brief dry periods. Watch for condensation forming on the glass—this is normal and indicates the humidity dome is working.
⏰ Step 4: Monitor and Maintain the Environment
Check the enclosure every 3-4 days for signs of over-moisture—yellowing leaves, mushy roots, or a sour, musty smell mean it’s time to adjust. If the moss looks dry, mist the inside of the glass with lukewarm water until droplets form on the glass. Avoid wetting the leaves directly; orchids are prone to rot if their crown stays damp.
Rotate the orchid quarter-turn weekly so all sides receive even light. You’ll notice new growth emerging from the topmost nodes—this is your cue that the humidity dome is successful. When buds form, reduce lid time to 5 minutes daily to encourage blooming; orchids need a slight dry spell to trigger flowers.
✂️ Step 5: Transition Out of the Dome
Once your orchid develops 3-4 new leaves or blooms, it’s ready to graduate to room conditions. Remove the lid gradually—start with 30 minutes open per day, then increase by 15 minutes daily over 7-10 days. This hardening-off period prevents shock from sudden humidity changes.
Keep the orchid in the same bright, indirect light location and water it once a week by soaking the pot for 10 minutes, then draining excess. You’ll see the glass dome’s magic in longer-lasting blooms and healthier pseudobulbs—proof that a little glass and patience go a long way.
Tips & tricks for perfect orchid humidity domes
These practical insights will help you troubleshoot common challenges and maximize your orchid's success in its glass haven.
Container Selection Wisdom: Quart-sized mason jars are my go-to for single orchids, but if you're working with larger plants, consider wide-mouthed glass containers or even repurposed fishbowls. The key is maintaining that 2-3 inch air space—this prevents stagnant air buildup while allowing proper humidity circulation. I've found that containers with slightly textured glass (like some decorative jars) actually help condensation cling to the sides, creating a more natural misting effect that orchids love.
Moss Preparation Technique: When soaking your 1-inch layer of sphagnum moss for Step 2, I've learned that using room-temperature distilled water (if available) prevents mineral buildup that can stress orchid roots over time. After the 10-minute drain, spread the moss on a clean surface and gently press out any excess water with your fingers—this ensures your orchid won't sit in soggy conditions. The moss should feel like a well-wrung sponge, not a dripping washcloth.
Light Positioning Strategy: The 65-75°F temperature range mentioned in Step 3 is crucial, but don't overlook the vertical positioning of your dome. Place taller orchids toward the back of your windowsill so all plants receive equal light exposure. I've noticed that orchids positioned too close to the glass often develop uneven growth patterns—this is because one side gets more intense light than the other. A simple solution is to rotate your dome quarter-turn weekly as mentioned, but also adjust vertical positioning every few days.
Transition Timing Secret: The gradual 7-10 day hardening-off period in Step 5 is where many growers make mistakes. Instead of increasing lid time by 15 minutes daily, I recommend starting with 30 minutes open and then increasing by 10 minutes every other day. This slower transition gives your orchid's leaves time to adjust their moisture regulation, preventing the sudden wilting I've seen when growers rush this process. Watch for leaves that remain plump and vibrant—they're telling you the transition is going well.
Pro Tips for Grow Orchids In Glass
- These practical insights will help you troubleshoot common challenges and maximize your orchid's success in its glass...
- Container Selection Wisdom: Quart-sized mason jars are my go-to for single orchids, but if you're working with larger...
- Moss Preparation Technique: When soaking your 1-inch layer of sphagnum moss for Step 2, I've learned that using room-...
Frequently asked questions
Got questions about growing orchids in glass? You’re not alone! Here are some of the most common concerns—and their simple solutions to keep your orchids thriving in their humidity domes.
How often should I open the glass dome to check on my orchids?
Open the dome every 2–3 days for 10–15 minutes to prevent mold, check moisture, and allow airflow. Use this time to inspect leaves for pests or wilting. If humidity feels too high (condensation inside), crack it open longer or add a small fan nearby.
Can I use a glass cloche for orchids year-round, or should I remove it in summer?
Glass cloches work year-round, but adjust care in summer: reduce watering (glass traps heat), move to partial shade, and open the dome daily to avoid overheating. In winter, keep it closed longer to retain warmth—just ensure temps stay above 60°F (15°C).
What if my orchid leaves turn yellow inside the glass dome?
Yellow leaves usually signal overwatering or poor airflow. Let the medium dry slightly between waterings, and open the dome longer to improve circulation. If roots smell rotten, repot in fresh bark mix and trim dead roots. Pro tip: Spray leaves with neem oil to prevent fungal issues.
Are there alternatives to glass cloches for humidity control?
Yes! Try:
- Plastic terrariums (cheaper, but watch for algae)
- Humidity trays (pebble + water setup under pots)
- Clear plastic bags (DIY, but remove daily for airflow)
- Grouping plants (place orchids near other tropical plants)
Why isn’t my orchid blooming inside the glass dome?
Orchids need a temperature fluctuation (10–15°F/5–8°C drop at night) to trigger blooms. Try:
- Moving the dome near a cool window at night
- Using a small fan to mimic breeze
- Fertilizing with high-phosphorus blooming formula every 4–6 weeks
Wrapping up and next steps
Growing orchids in glass containers is a rewarding way to create a thriving, humidity-rich environment that encourages year-round blooms. With the right setup—clear glass, proper airflow, and consistent care—you’ll unlock a lush, tropical haven for your orchids. 🌿✨
Ready to take the next step? Start with one or two orchids in your glass dome, and soon you’ll be experimenting with different varieties and designs. Your green thumb is about to shine brighter than ever!