
Flowers
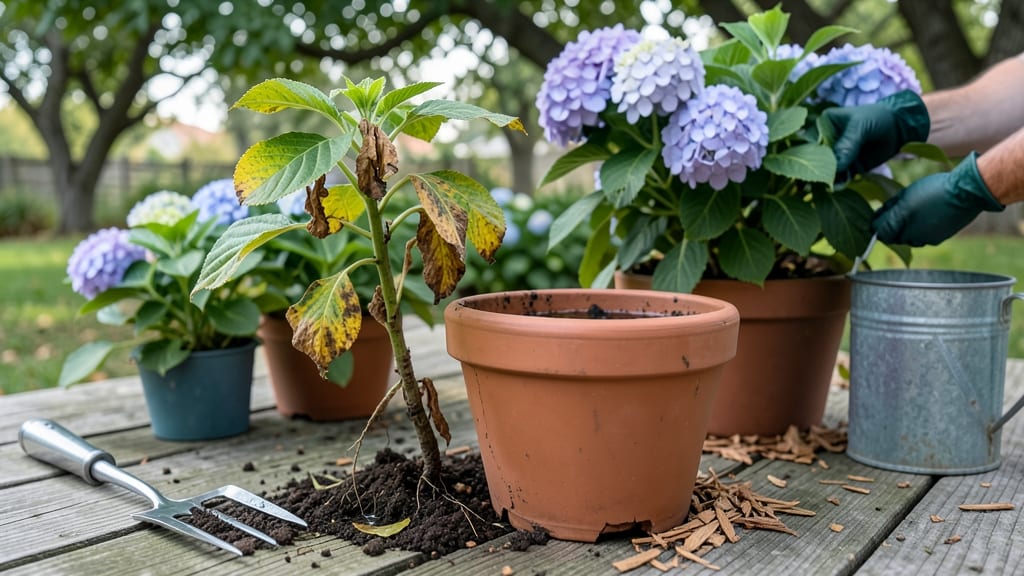
How to fix an overwatered hydrangea—those yellowing leaves are a cry for help, not a sign of doom. 🌿 I’ve nursed back more soggy hydrangeas than I’d like to admit, and the fix starts with understanding why they’re struggling. Overwatering suffocates roots, turning vibrant green into sad, limp yellow—often with a mushy stem to prove it.
The good news? Recovery is fast if you act now. First, stop watering entirely and let the soil dry out completely—this alone can save a plant in 3-5 days.
Then, improve drainage by adding perlite or sand to compacted soil. Prune any blackened stems at the base with clean shears, and you’ll see fresh growth within weeks.
What you’ll end up with is a hydrangea that’s lush and productive again—no more wilting blooms or sad yellowing. The key is balancing moisture: hydrangeas need consistent dampness, not soggy soil. Think of it like a sponge—it should hold water, not drown in it.
This method works for both in-ground and container hydrangeas, and the same principles apply to other moisture-sensitive plants like azaleas and rhododendrons. Once you’ve saved one, you’ll spot the signs early in others—trust me, your garden will thank you.
📚 In This Guide
- What you need
- Instructions
- Tips and common mistakes
- Wrapping up and next steps
What you need
- ● Well-draining potting mix (2–3 bags, moisture-wicking blend like a blank">cactus/succulent mix or blank">orchid bark mix—avoid peat-heavy soils!).
- ● Large containers or pots (1–2 per hydrangea, 1–2 inches larger in diameter than the current pot with blank">drainage holes).
- ● Gloves (heavy-duty, nitrile or leather—hydrangea roots can be gross when soggy!).
- ● Pruning shears (sterilized, sharp and clean to avoid spreading disease).
- ● Hose or watering can with a fine rose attachment (for gentle watering—no blasting!).
- ● Saucer or tray (to catch excess water and prevent root rot).
- ○ Fungicide (optional but helpful) (e.g., blank">copper fungicide or neem oil spray to treat fungal issues from overwatering).
- ● Choose a sunny day (or a well-ventilated space) to work—hydrangeas hate soggy conditions and humidity!
- ● Check the weather forecast—hold off if rain is predicted for the next 24–48 hours.
- ● Have a trash bag ready for clippings and old, mushy soil.
- ○ Test your soil pH (optional but useful)—overwatered hydrangeas often need acidic soil (pH 5.2–6.2) for optimal bloom color.
Step-by-Step instructions for reviving overwatered hydrangeas
Here's the fast-track method I use to rescue soggy hydrangeas—within days, not weeks.
☀️ Step 1: Stop Watering and Assess the Roots
Immediately cease all watering to prevent further root suffocation. Hydrangeas in saturated soil can't breathe, and their roots begin to rot within 48 hours of constant moisture. Use your finger to check the soil 2-3 inches down—if it feels cold, slimy, or smells like rotten fruit, the roots are already compromised.
Move the plant to a dry, shaded spot if it's currently in wet ground. If repotting isn't an option, mound 2-3 inches of coarse sand or perlite around the base to improve drainage. This creates a temporary barrier that prevents water from pooling around the roots while you work on recovery.
💧 Step 2: Drain Excess Water and Loosen Compacted Soil
Dig a 1-inch-deep trench around the hydrangea's root ball, about 6 inches from the stem. This encourages water to flow away from the roots instead of pooling. If the plant is in a container, place it in a shallow tray filled with 1-2 inches of gravel to catch excess drainage.
Gently loosen the soil around the roots with your fingers or a small fork. Avoid disturbing the roots themselves—focus on breaking up compacted areas where water would otherwise stagnate. If the soil is heavy clay, mix in 1 part perlite to 3 parts soil to improve aeration immediately.
✂️ Step 3: Prune Damaged Foliage and Stimulate New Growth
Snip off any leaves that are yellow, mushy, or blackened using sterilized pruners. Diseased tissue won't recover and can spread rot to healthy parts. Cut back to the nearest healthy green leaf—this signals the plant to redirect energy to new growth rather than supporting dead material.
Trim overly leggy stems by one-third to encourage bushier regrowth. Focus on stems that are hollow or have a dark center, as these are past saving. After pruning, spray the plant with a fungicide solution (1 part hydrogen peroxide to 10 parts water) to prevent secondary infections.
🌱 Step 4: Adjust Watering and Fertilize for Recovery
Water only when the top 2 inches of soil feel dry—this could take 5-7 days at first. Use a 5-gallon bucket with a slow-drip hose attachment to water deeply but gently, ensuring moisture reaches the root zone without oversaturating. Avoid overhead watering, which can promote fungal growth on damp leaves.
Apply a balanced, water-soluble fertilizer (10-10-10) at half-strength to provide essential nutrients without overwhelming the stressed plant. Repeat every 2 weeks until new growth appears. If the hydrangea is in acidic soil (blue blooms), add 1 tablespoon of aluminum sulfate to the soil to restore pH balance.
⏰ Step 5: Monitor and Protect for 4-6 Weeks
Watch for new leaves emerging from the stem nodes—this is your sign the plant is recovering. If no growth appears after 3 weeks, the roots may be too damaged, and you'll need to propagate from healthy cuttings. Keep the area weed-free around the base, as weeds compete for moisture and nutrients.
Protect the hydrangea from direct afternoon sun for the first 2 weeks of recovery. Use a light shade cloth if necessary, as stressed plants are more susceptible to sunburn. Once new growth hardens off (feels firm to touch), gradually reintroduce full sun over 5-7 days to prevent shock.
Tips & tricks for reviving overwatered hydrangeas
Real talk: The first 48 hours after noticing overwatered hydrangeas are your golden opportunity to save them—don't waste them. Here's what nobody tells you about making those critical first moves count.
Root Assessment: When checking soil moisture in Step 1, press your finger 2-3 inches down—this is where the real rot starts. If you detect that rotten fruit smell (like overripe apples), you're dealing with root rot, and you'll need to act even faster. Grab a clean trowel and scrape away a small section of soil near the roots to check for black, mushy areas. This visual check is often more telling than just the smell.
Drainage Hacks: For container-grown hydrangeas in Step 2, I've found that adding 1-2 inches of expanded clay pebbles to the bottom of the pot before repotting creates a permanent drainage layer. These pebbles won't compact like gravel and will last for multiple repottings. If you're working with heavy clay soil, mix in 1 part perlite to 3 parts soil—this isn't just about aeration, it's about creating tiny air pockets that roots desperately need to breathe.
Pruning Precision: In Step 3, when you're pruning those leggy stems, make your cuts at a 45-degree angle just above a leaf node. This angled cut prevents water from pooling on the stem, which could lead to further rot. And here's a pro move: after pruning, wipe down the cuts with a damp cloth to remove any sap—this helps prevent fungal spores from settling on fresh wounds.
Watering Wisdom: The 5-7 day wait before watering again in Step 4 might feel agonizing, but it's crucial. Use a moisture meter to check soil dryness—these inexpensive tools take the guesswork out of hydration. If you're worried about the plant drying out too quickly, place the pot on a saucer filled with 1 inch of water (not touching the pot) to create humidity around the roots without oversaturating them.
Pro Tips for Fix Overwatered Hydrangea
- Real talk: The first 48 hours after noticing overwatered hydrangeas are your golden opportunity to save them—don't waste them.
- Root Assessment: When checking soil moisture in Step 1, press your finger 2-3 inches down—this is where the real rot starts.
- Drainage Hacks: For container-grown hydrangeas in Step 2, I've found that adding 1-2 inches of expanded clay pebbles to the bottom of the pot before repotting creates a permanent drainage layer.
Frequently asked questions
How do I know if my hydrangea is overwatered vs. underwatered?
Check the soil first—overwatered hydrangeas have soggy, mushy roots and yellow, drooping leaves, while underwatered ones feel dry and crispy at the edges. Stick your finger 2-3 inches deep: if it’s damp, you’re overwatering. Pro tip: Lift the plant gently—if it feels heavy, it’s waterlogged!
How long does it take for an overwatered hydrangea to recover?
With proper care, you’ll see improvement in 1-2 weeks, but severe cases may take up to a month. Focus on reducing water, improving drainage, and trimming dead foliage. Patience is key—hydrangeas are resilient but need time to bounce back!
Can I save my hydrangea if the roots are rotting?
Yes, but act fast! Prune any mushy, black roots with sterilized scissors, repot in fresh, well-draining soil, and reduce watering. If most roots are healthy, it’ll recover. If over 50% are rotted, propagation from cuttings may be your best bet.
Should I water my hydrangea after fixing overwatering issues?
Wait until the top 1-2 inches of soil are dry to the touch. Then, water deeply but only when needed. Use a moisture meter or your finger to check—hydrangeas prefer consistently moist (not soggy) soil. Adjust based on your climate!
Will overwatering kill my hydrangea permanently?
Not necessarily! If you catch it early and adjust care, hydrangeas are tough. However, chronic overwatering can lead to root rot and death. The good news? With proper drainage, pruning, and a balanced watering routine, most overwatered hydrangeas make a full recovery.
Wrapping up and next steps
Reviving an overwatered hydrangea is totally doable with the right care—just drain the excess moisture, trim the damage, and adjust your watering routine. 🌱 Remember, patience and consistency are key as roots recover and leaves bounce back to their vibrant best.
Now that you’re armed with the know-how, take action today—check your soil, prune wisely, and give your hydrangea the fresh start it deserves!
Pro tip: Keep an eye on your plant’s progress and celebrate small wins—like new green leaves—as you work toward a lush, thriving bush! 🌿