
Vegetables
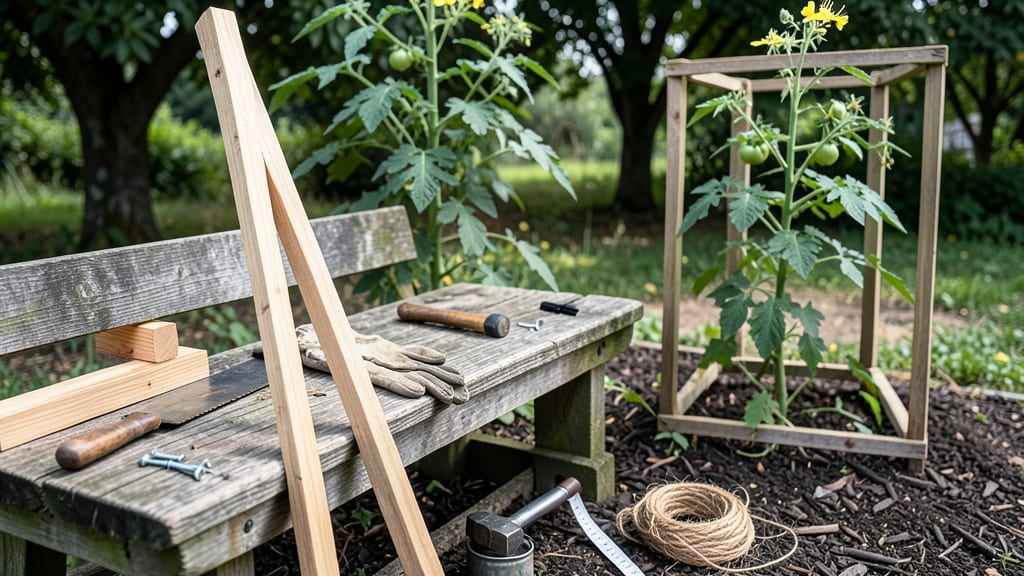
Building your own wood tomato cages saves money and grows sturdier vines than store-bought versions. 🌱 I learned the hard way—flimsy cages collapse under 6-foot 'Sungold' plants, leaving tomatoes sprawled in the dirt. This grid design supports heavy fruit while staying simple enough for beginners.
You'll need untreated cedar or pine (2x2 posts, 1x2 slats), a saw, drill, and outdoor screws. Cedar lasts years without rotting, while pine works for one season. Cut four 6-foot posts and eight 3-foot slats—arrange them in a square grid with 12-inch gaps for airflow and easy harvesting.
Assembly takes under an hour: pre-drill holes to prevent splitting, attach slats horizontally at 18-inch intervals, then reinforce corners with extra screws. Paint with non-toxic exterior stain to extend life—my first cage lasted five seasons with just this treatment. The result?
Vines climb confidently, fruit ripens cleanly, and you avoid the annual cage collapse. Perfect for heirloom varieties or small-space gardens where vertical growth is a must. Let's get building!
📚 In This Guide
- What you need
- Instructions
- Tips and common mistakes
- Wrapping up and next steps
What you need
- ● 1x4 or 2x2 lumber – 6 to 8 pieces, each 6 to 8 feet long (depending on desired height). Cedar or pressure-treated wood is ideal for durability.
- ● Galvanized or deck screws – 1.5 to 2 inches long, 16 to 20 pieces (stainless steel screws resist rust).
- ● Wood glue – 1 small bottle (for extra reinforcement).
- ● Measuring tape – For precision cuts.
- ● Circular saw or miter saw – To cut lumber to size.
- ● Drill/driver – For assembling screws.
- ● Pencil & straightedge – For marking cuts.
- ○ Clamps (optional but helpful) – To hold pieces steady while assembling.
- ● Sandpaper (medium grit) – To smooth rough edges.
- ● Wood stain or paint – For a polished look (choose non-toxic options).
- ● Corrugated plastic or wire mesh – To add a grid-like support for vines.
- ● Post hole digger – If you plan to bury the base for extra stability.
Step-by-Step instructions for building wood tomato cages
Here's the straightforward method I use to build cages that actually hold up all season.
🪴 Step 1: Gather Materials and Cut Wood Pieces
You'll need 4 vertical supports (each 7 feet tall), 4 horizontal rings (each with 8 evenly spaced vertical slats), and 4 diagonal cross-braces for stability. I cut my vertical supports from 2x2 lumber—this thickness prevents cages from bending under heavy vines. For the rings, use 1x2 boards cut into 12-inch lengths for each slat, plus 4 corner posts that are 18 inches tall.
Mark measurements carefully: the rings should be 12 inches in diameter with slats spaced 1.5 inches apart. Use a miter saw for clean cuts on the diagonal braces—these connect the vertical posts to the rings at 45-degree angles. Real talk: double-check your measurements before cutting. You won't get a second chance once the wood is gone.
✂️ Step 2: Assemble the Vertical Frame
Start by attaching the 4 corner posts to the base of each vertical support using 2.5-inch deck screws. Space the vertical posts 12 inches apart in a square configuration. This creates your base platform where the rings will sit. I pre-drill holes to prevent wood splitting—always a good move with fresh lumber.
Next, connect the top of each vertical post with 2x4 horizontal beams to form a square frame. Use 3-inch screws and add corner braces for extra stability. Your frame should now resemble a 4-foot cube with open sides. This will be the skeleton holding your entire cage together. Don't skip the corner braces—this is where most DIY cages fail under weight.
🌿 Step 3: Build and Attach the Horizontal Rings
Assemble each ring by attaching the 12 slats to the 4 corner posts using 1.5-inch screws. Space the slats evenly around the circle, leaving 1.5-inch gaps between each. I use a clamp to hold everything steady while screwing. Once all four rings are complete, slide them onto the vertical frame at 12-inch intervals—so you'll have rings at 12", 24", 36", and 48" heights.
Secure each ring to the vertical frame with 2 screws per corner post. The rings should rotate freely when you give them a gentle twist—this lets vines weave through naturally. If they feel stiff, adjust your screws slightly. You'll know it's right when you can spin a ring with one hand while the cage stays stable.
🔧 Step 4: Add Diagonal Braces for Maximum Stability
Cut your 4 diagonal braces from 1x2 lumber at 24-inch lengths. These connect each vertical post to the adjacent ring's corner posts, forming an X pattern when viewed from the side. Attach them with 2-inch screws at both ends. I position the first brace at 18 inches from the base, then add a second brace at 30 inches for extra reinforcement.
The braces should create a pyramid-like structure when viewed from any angle. This design prevents the cage from leaning or collapsing under the weight of heavy tomatoes. Test your cage by gently pushing on each side—it should hold firm without wobbling. If it feels unstable, add an extra brace or tighten existing connections.
☀️ Step 5: Finish and Position the Cage
Sand all rough edges and edges of the screws to prevent splinters. I use outdoor-rated wood stain to protect the wood from moisture and UV damage—this extends the life of your cage by years. Let it dry completely before use. For extra durability, apply a waterproof sealant after staining.
Position your finished cage near your tomato plants, ensuring the open side faces outward toward the plant. This makes it easier to weave vines through the slats as they grow. Water your tomatoes deeply after installing the cage—this helps the roots establish while the vines start climbing. You'll see the first tendrils reach for the cage within 1-2 weeks, and that's when the real fun begins.
Tips & tricks for sturdy wood tomato cages
Building tomato cages that actually last requires just a few smart tricks to avoid common pitfalls.
Precision Cutting: When cutting your 12-inch slats for the rings in Step 1, use a straightedge guide to ensure they're perfectly even. I mark my measurements with a pencil first, then double-check with a tape measure before cutting. Uneven slats can make the rings wobble, and that's the last thing you want when heavy tomato vines start climbing. A carpenter's square helps verify those 45-degree angles for the diagonal braces too—trust me, your cage will thank you.
Screw Placement Strategy: In Step 2, when attaching the corner posts to vertical supports with 2.5-inch deck screws, I use a screw gun set to medium speed to prevent wood splitting. For the diagonal braces in Step 4, position screws 1 inch from each end of the brace—this creates a stronger connection than screwing right at the corners. The 2-inch screws should go straight in; if they wobble, you're not hitting the wood properly.
Ring Assembly Hack: For Step 3, assemble your rings on the ground first before sliding them onto the frame. This makes it easier to space those 12 slats evenly with 1.5-inch gaps. I use a clamp** to hold the first slat in place while I attach the rest, then test the ring's rotation before securing it to the frame. If a ring feels stiff after attaching, gently tap the screws with a rubber mallet to loosen them slightly—this prevents cracking when vines start growing through.
Stability Test: After completing Step 4, give your cage a thorough shake test before finishing. Push each side firmly—it should hold without flexing. If you notice any wobble, add an extra diagonal brace or tighten existing screws. I've seen cages collapse under 5-pound tomatoes because of weak connections, so don't skip this step. A sturdy cage means fewer tomatoes hitting the ground!
Pro Tips for Build Tomato Cages Wood
- Building tomato cages that actually last requires just a few smart tricks to avoid common pitfalls.
- Precision Cutting: When cutting your 12-inch slats for the rings in Step 1, use a straightedge guide to ensure they'r...
- Screw Placement Strategy: In Step 2, when attaching the corner posts to vertical supports with 2.5-inch deck screws, ...
Frequently asked questions
Got questions?
Building your own wood tomato cages is a rewarding project, but it’s natural to have a few uncertainties along the way. Here are answers to the most common questions to help you craft the perfect sturdy grid for your towering vines!
How tall should my wood tomato cages be?
For most tomato varieties, aim for 5 to 6 feet tall—this gives vines plenty of room to climb without toppling. If you’re growing indeterminate varieties (like cherry tomatoes), consider extending them to 7 feet for maximum yield. Pro tip: Measure your garden space first!
Can I use untreated wood for tomato cages?
While untreated wood is cheaper, it’s not ideal for tomato cages because it can harbor mold, rot, or pests. Opt for cedar, redwood, or pressure-treated pine (labeled for ground contact) to ensure durability and safety. If using pressure-treated wood, let it cure for 1-2 months before planting.
How long does it take to build a DIY tomato cage?
With pre-cut materials and basic tools, you can assemble a single cage in 30-60 minutes. If you’re building multiple cages or customizing the design, budget 1-2 hours. Work efficiently! Break it into steps (e.g., cutting, assembling, securing) to save time.
What’s the best alternative if I don’t want to build wood cages?
No problem! Try these low-maintenance alternatives:
- Metal cages or trellises: Sturdy and reusable, but heavier.
- Bamboo stakes or poles: Eco-friendly and easy to install.
- Repurposed materials: Old ladders, wire fencing, or even PVC pipes work in a pinch!
Why is my tomato cage leaning or collapsing?
Leaning or collapsing cages usually mean weak joints or insufficient bracing. Double-check your corner connections—use 3-inch screws or heavy-duty staples instead of nails. For extra stability, stake the cage into the ground or tie it to a nearby post. Prevention is key!
Wrapping up and next steps
Building your own wooden tomato cages is a rewarding project that saves money and gives your plants the support they deserve! With just a few materials and a little elbow grease, you’ve got a sturdy, custom grid to help those vines reach their full potential. 🌱✨
Now that you’re ready to tackle this DIY task, grab your tools and get building—your tomatoes will thank you with bountiful harvests! For even more gardening inspiration, check out our guide to companion planting next.