
How To
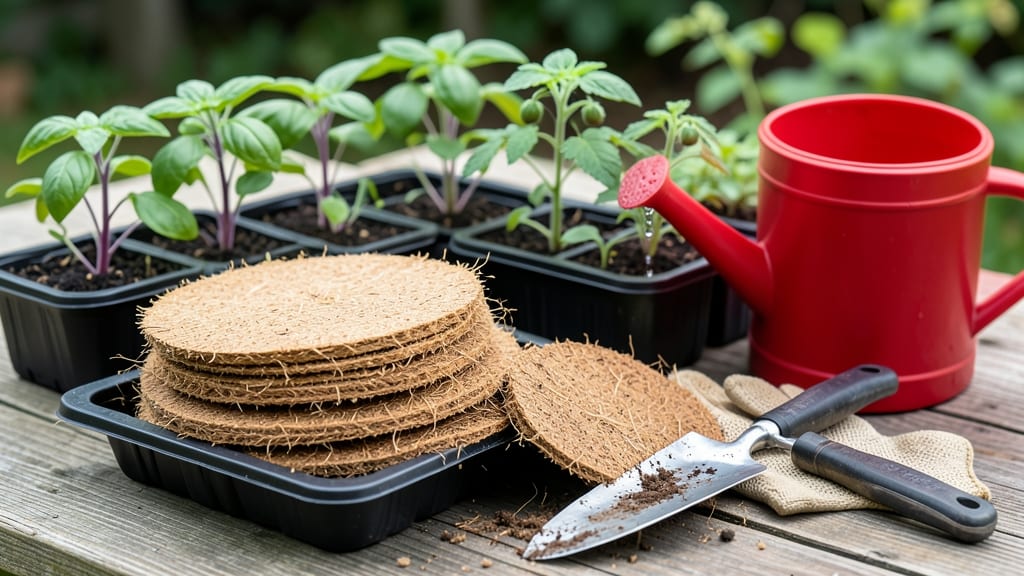
Coir discs how to use—they’ve turned my seed-starting failures into lush, healthy seedlings. 🌱 These little discs—made from coconut fiber—hold moisture perfectly while giving roots the air they crave, unlike soggy peat pellets or brittle rockwool. No more leggy, weak sprouts struggling to establish; just strong starts ready for transplanting.
The secret is simple prep: soak them for 10-15 minutes until they expand to 2-3 times their size, then place seeds right on top—no digging required. Works for everything from delicate lettuce to tough tomatoes, and you can even reuse the pots by composting them after harvest.
My basil seedlings now sprout in 5 days, not the usual 10.
What makes coir discs special is their balance: they won’t dry out like rockwool or compact like soil mixes. Plus, they’re eco-friendly—no peat harvesting destroys ecosystems. The only rule? Don’t drown them; keep them damp, not soggy, and you’ll see roots exploring within a week.
Perfect for beginners or anyone tired of seed-starting drama. Once you try them, you’ll wonder how you ever grew without. Here’s how to get your first batch growing right—no guesswork, just results.
📚 In This Guide
- What you need
- Instructions
- Tips and common mistakes
- Wrapping up and next steps
What you need
- ● Coir discs: 1–2 packs (20–50 discs per pack, depending on your needs). Choose 100% coir discs for the best results.
- ● Seeds: Your preferred variety (check seed packet for germination instructions).
- ● Water: Room-temperature, filtered or rainwater (avoid tap water with chlorine).
- ○ Clear plastic dome or ziplock bag: For humidity (optional but recommended for faster germination).
- ● Small container or tray: To hold the discs while they hydrate (e.g., a shallow dish or seedling tray).
- ● Scissors or knife: For cutting the coir discs if needed (some seeds benefit from a smaller starter).
- ○ Plant labels (optional): To track seed varieties if testing multiple types.
- ● Seedling heat mat: Speeds up germination for slow starters (e.g., peppers or tomatoes).
- ● Grow lights: If your space lacks natural sunlight, especially for early seedlings.
- ● Misting bottle: For gentle hydration without over-saturating the coir.
- ● Perlite or vermiculite: Mix in a pinch for extra aeration if transitioning to soil later.
- ● Fertilizer (diluted): A mild seaweed or fish emulsion solution (1/4 strength) for nutrient boosts.
Step-by-Step instructions for using coir discs to start seedlings
This soil-free method produces stronger roots and healthier seedlings—here's how to master it.
🌱 Step 1: Prepare Your Seeds and Coir Discs
Start by soaking your coir discs in warm water for 5-10 minutes until they expand to about 1.5 inches thick. The discs should feel pliable but not mushy—squeeze gently to test. While they soak, prepare your seed tray by placing one disc in each cell. I like to use a clear plastic tray so I can monitor moisture levels easily.
Once expanded, gently press each disc down to create a snug fit in the tray. The discs should sit flush with the tray edges, creating a stable base for your seeds. If any discs don't expand evenly, give them another minute or two in the water. Uneven discs can lead to inconsistent moisture distribution later.
💧 Step 2: Plant Your Seeds at the Right Depth
Place 1-2 seeds in the center of each coir disc, pressing them in just deep enough to cover with a thin layer of the coir fiber—about ¼ inch deep. The discs' natural fibers will hold the seeds in place without needing extra soil. I find it helpful to use a toothpick to create a small dimple if the seeds don't settle naturally.
After planting, mist the surface lightly with room-temperature water until the coir feels evenly damp. Avoid soaking the discs, as excess water can suffocate seeds. You'll know it's right when the coir looks dark and moist but not dripping. Cover the tray with a clear plastic dome or wrap to retain humidity—this mimics the moist environment seeds need to germinate.
☀️ Step 3: Provide Ideal Conditions for Germination
Place your tray in a warm location with indirect light—a bright windowsill works well, but avoid direct sun until seeds sprout. Coir discs germinate best at 70-75°F, so if your home runs cooler, consider using a seedling heat mat. Check the discs daily and mist lightly if the surface feels dry to the touch.
Germination typically occurs in 7-14 days, depending on the seed type. You'll see the first signs when small green shoots push through the coir fibers. Once sprouts appear, remove the dome immediately to prevent damping-off—a fungal disease that attacks tender seedlings. At this stage, move the tray to a spot with bright, indirect light for another 3-5 days before introducing direct sun.
🌿 Step 4: Transition to Direct Light and Encourage Strong Roots
After the first true leaves appear (the second set of leaves, not the initial cotyledons), gradually introduce 4-6 hours of direct sunlight daily. Start with 1-2 hours and increase by 1 hour every other day
Water the discs when the top layer feels dry, using a spray bottle to avoid disturbing the seedlings. Overwatering at this stage can lead to root rot, so always check moisture before adding more. If you notice yellowing leaves, it's often a sign of overwatering or insufficient light—adjust accordingly. The coir discs' natural aeration helps prevent root issues, but consistency is key. When seedlings have 2-3 sets of true leaves and roots are visibly growing through the coir, they're ready for transplanting. Gently remove each seedling by lifting the coir disc from the tray—roots will naturally unfold as you handle them. This method reduces transplant shock because the coir protects roots from damage. Place the coir disc directly into the soil, ensuring the top of the disc sits flush with the soil surface. The coir will break down over time, enriching the soil with organic matter. Water thoroughly after transplanting to help the coir integrate with the surrounding soil. Seedlings started in coir discs often establish faster because their roots are already strong and healthy.⏰ Step 5: Transplant Seedlings with Minimal Stress
Tips & tricks for perfect soil-free seedling growth with coir discs
Mastering this soil-free method takes just a few key adjustments—here's how to maximize your seedlings' potential.
Moisture Management: During the 5-10 minute soaking time in Step 1, use a kitchen scale to weigh your coir discs before and after soaking. They should absorb about 1.5x their dry weight in water. This precise hydration prevents uneven expansion and ensures consistent moisture for germination. Too little water means poor seed contact, while too much can suffocate seeds.
Seed Placement Technique: In Step 2, when planting your 1-2 seeds at ¼-inch depth, I recommend using a toothpick to create a tiny indentation in the coir fibers. This helps seeds maintain proper depth without being buried too deeply. The natural fibers will hold them securely, but this extra step prevents seeds from floating to the surface during watering.
Temperature Consistency: Maintaining the 70-75°F range in Step 3 is crucial—coir discs lose their structural integrity below 65°F. If your home runs cooler, place the tray on a seedling heat mat set to low heat (around 60°F). This subtle warmth boosts germination rates without risking overheating. Monitor with a thermometer to avoid exceeding 80°F, which can stress young seedlings.
Light Transition Strategy: When gradually increasing direct sunlight in Step 4, I suggest using a shade cloth during the first 2-3 days of sunlight exposure. This mimics natural acclimation and prevents sunburn on tender leaves. Start with 50% shade coverage and reduce by 10% every other day until full sun is achieved.
Pro Tips for Coir Discs How To Use
- Mastering this soil-free method takes just a few key adjustments—here's how to maximize your seedlings' potential.
- Moisture Management: During the 5-10 minute soaking time in Step 1, use a kitchen scale to weigh your coir discs befo...
- Seed Placement Technique: In Step 2, when planting your 1-2 seeds at ¼-inch depth, I recommend using a toothpick to c...
Frequently asked questions
Got questions about coir discs?
You’re not alone! Here are answers to the most common ones to help you get started confidently.
How do I know if my coir discs are ready to use?
Coir discs are ready to use straight out of the package—no prep needed! Just soak them in water for 5–10 minutes until they expand to about 2–3 times their original size. Over-soaking can cause mold, so drain excess water before planting.
How long do coir discs take to germinate seeds?
Germination time varies by plant, but most seeds sprout within 3–14 days in coir discs. Keep them in a warm, humid environment (70–80°F) with indirect light. Check moisture daily—discs should stay damp but not soggy.
Can I reuse coir discs after germination?
No, coir discs are single-use after germination. Once roots emerge, transplant seedlings into soil or a larger growing medium. Attempting to reuse them risks mold or stunted growth. Think of them as a temporary, eco-friendly nursery!
What’s a good alternative if I can’t find coir discs?
Try these seed-starting alternatives:
- Peat pellets – Similar structure, but less sustainable.
- Jiffy pots – Biodegradable, but may require more watering.
- Paper towels + plastic wrap – Budget-friendly for fast germination.
- Coconut fiber pots – Eco-friendly and reusable.
My coir disc smells bad—what’s wrong?
A musty or sour smell usually means overwatering or mold. Drain excess water immediately, remove any slimy discs, and ensure good airflow. For future use, soak discs in hydrogen peroxide (1 part H₂O₂ to 10 parts water) for 5 minutes to sterilize before planting.
Wrapping up and next steps
Mastering the use of coir discs is a game-changer for seedling growth—no soil, no fuss! 🌱 These eco-friendly discs simplify propagation, ensuring strong roots and healthier plants with minimal effort. Whether you're a gardening novice or a green-thumb pro, this method saves time and space while delivering amazing results.
Ready to take your gardening to the next level? Start experimenting with coir discs today! Try them with your next batch of seedlings and watch your plants thrive like never before. Happy growing! 🌿